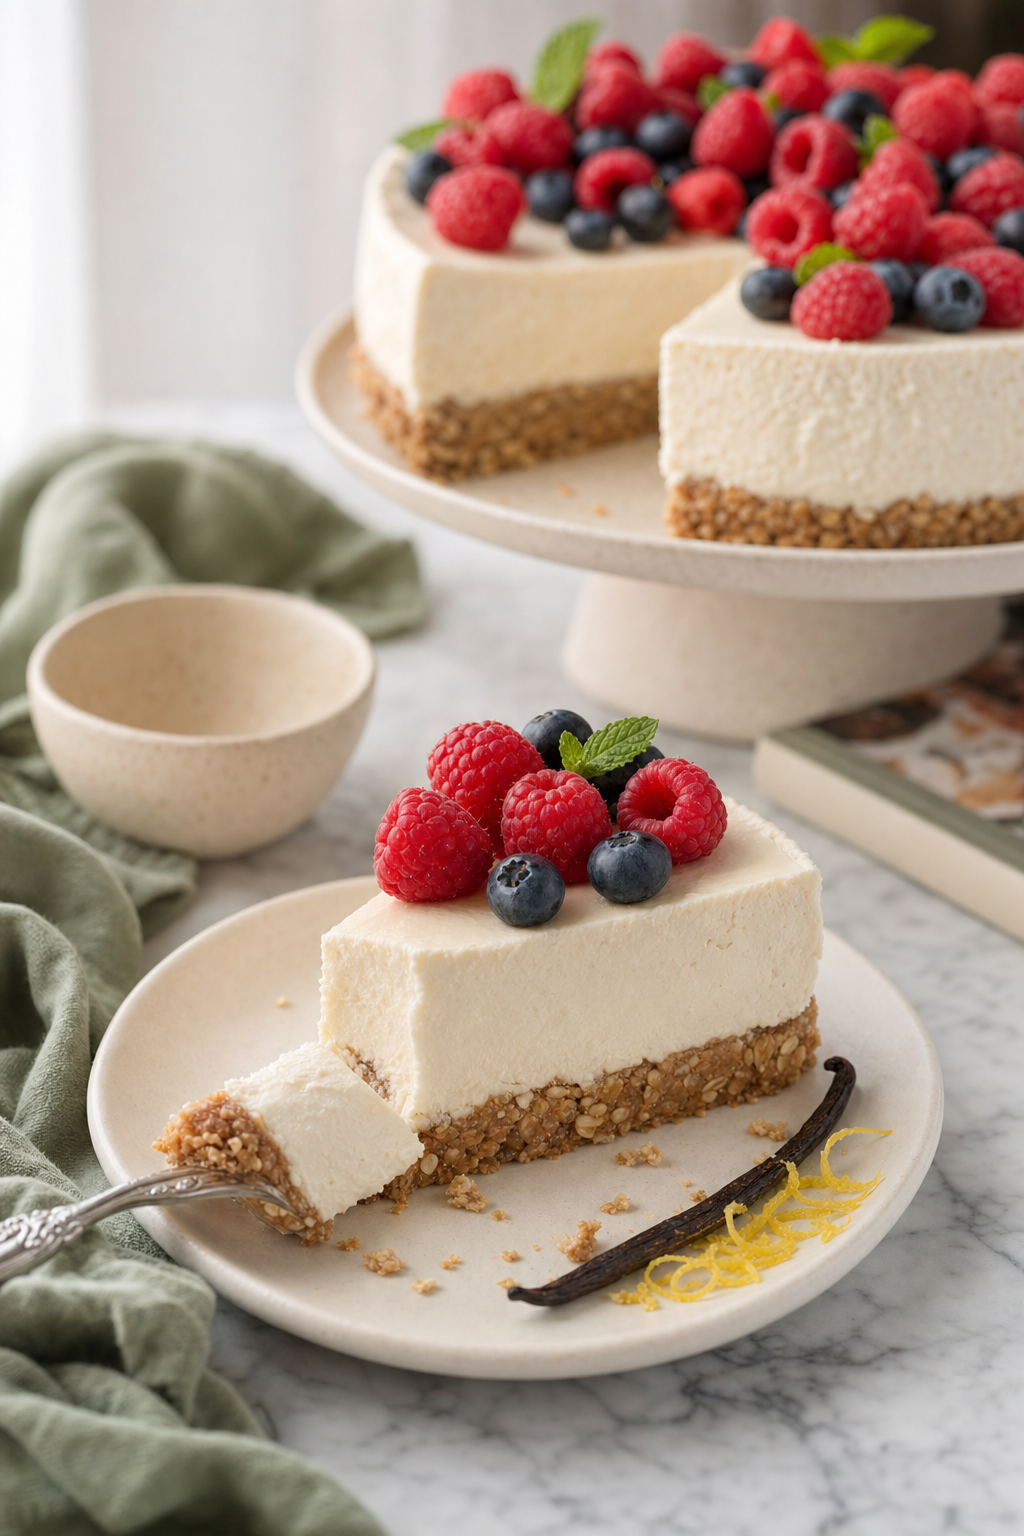
No-Bake Cottage Cheese Cheesecake (High-Protein, 27g/Slice)
The first time I served this cheesecake at a dinner party, my friend Maddie took a bite, paused, said “okay this is unreal,” and went back for a second slice. Ten minutes later I told her there was a full pound of cottage cheese in it. She put her fork down. Stared at me. Then picked the fork back up and finished the slice anyway.
That, friends, is the whole pitch. This is the recipe that turned three of my “ew, cottage cheese” friends into people who text me from the dairy aisle asking which brand to grab. It’s the recipe my non-lifting friends ask for at family dinners. It’s the recipe my grandma asked me to bring to Easter, and my grandma has been making cheesecake since the Carter administration.
I get it. Cottage cheese has a PR problem. For most of us, the word conjures up some pale beige tub from the back of our mom’s fridge in 1998, eaten plain on a sad iceberg lettuce leaf next to a canned peach half. The texture is doing nothing for anyone. The flavor is fine but unmemorable. It’s not the kind of food that inspires a recipe blog post.
Here’s what changed for me. A few years into running LiftAndBake and writing about high-protein desserts, I kept hitting the same wall: cream cheese cheesecakes are delicious but they’re a brick of fat with not much protein, and the protein-powder-cheesecake recipes floating around the internet always tasted like a chalky candle. I wanted something that genuinely tasted like the cheesecake my grandma makes — dense, creamy, tangy, sliceable — but actually delivered enough protein to count as a real dessert in my macros.
Cottage cheese was the answer hiding in plain sight. It’s roughly 13 grams of protein per half cup. It’s mild. It already has the slightly tangy dairy backbone that cheesecake needs. The only problem — and it is a real problem, not a fake problem — is the curds. You can’t just dump cottage cheese into a cheesecake filling and hope. You’ll get a lumpy, grainy, slightly weeping mess and everyone will be polite about it but nobody will ask for seconds.
The fix is so stupidly simple I almost can’t believe it took me three test batches to figure it out: you blend it. Hard. Like, full-blast-in-the-food-processor, scrape-the-sides, blend-some-more, blend-it-until-it-pours-like-thick-honey blend it. Once cottage cheese is fully blended smooth, all the curd texture vanishes and what you’re left with is the silkiest, tangiest dairy base on planet Earth. It tastes like cheesecake. Nobody — and I mean nobody — has ever guessed what’s in it on the first bite.
The second trick is gelatin instead of cream cheese for structure. Most no-bake cheesecakes use a giant brick of cream cheese to hold their shape, which is great for texture but bad for protein-per-calorie. By blooming a little powdered gelatin and stirring it in, I get a clean slice that holds its edges, no cream cheese required. The protein density goes up, the calorie density goes down, and the slices come out looking like they belong in a magazine.
Third trick: lemon zest. Not lemon juice — zest. It brightens everything. It’s the difference between “this is fine” and “wait, send me the recipe right now.”
If you’ve been burned by sad protein desserts before, I promise this one is different. It’s the hero recipe of the entire blog for a reason. Make it once, take it to a party, and watch the cottage cheese skeptics convert in real time. There is no greater joy.
Let’s bake. Sorry — let’s NOT bake. Let’s chill.
Why This Recipe Works
- The blender trick is the whole game. Cottage cheese curds are the only reason most people think they hate cottage cheese. Blending them smooth — really smooth, 60-90 seconds in a high-speed blender or food processor — turns the texture into pure silk. You get all the protein, none of the cottage-cheese-y mouthfeel. This is non-negotiable.
- Gelatin > cream cheese for clean slices and high protein. Traditional no-bake cheesecakes lean on a pound of cream cheese to hold their shape. Cream cheese is mostly fat, light on protein. Gelatin gives you crisp slice lines, a denser bite, and lets the cottage cheese and Greek yogurt actually deliver the protein. You also save about 600 calories across the whole cake.
- Lemon zest brightens the whole filling. A teaspoon of zest doesn’t make this a “lemon cheesecake” — it just lifts the dairy and keeps the filling from tasting flat or one-note. It’s the secret ingredient nobody guesses. Don’t skip.
- Full-fat dairy is doing structural work. 4% cottage cheese and 5%+ Greek yogurt aren’t just for flavor. The fat carries the vanilla and lemon, gives the filling that creamy mouthfeel, and helps it set with body instead of weeping. Low-fat versions get watery and chalky. Don’t substitute.
- The chill is non-negotiable. Gelatin needs at least 4 hours in the fridge to fully set, and overnight is even better. Try to slice it at hour 3 and you’ll get a sad puddle. Patience pays in clean cheesecake slices.
Ingredients You’ll Need
For the no-bake oat crust
- 1 1/2 cups (150g) rolled oats, pulsed coarse — old-fashioned, not instant. Use certified gluten-free oats if needed.
- 1/3 cup (90g) almond butter or peanut butter — the runny natural kind, not the dry kind from the bottom of the jar. Either nut butter works; peanut butter gives a more pronounced flavor, almond is more neutral.
- 3 tbsp (60g) maple syrup — real maple syrup, Grade A. Honey works in a pinch.
- Pinch of salt — flaky or kosher. Don’t skip, salt makes the oats taste like crust instead of oatmeal.
For the filling
- 2 cups (16 oz / 450g) full-fat cottage cheese — 4% milkfat, please. I love Good Culture (low additives, clean curds), but any 4% small-curd brand works. Avoid no-salt-added versions; the salt matters here.
- 1 cup (240g) full-fat Greek yogurt — 5% milkfat or higher. Fage Total 5% is my go-to. Stonyfield whole milk Greek also great.
- 1/4 cup (80g) maple syrup or honey — both work. Maple is more neutral, honey adds a slight floral note.
- 1 tsp pure vanilla extract — the real stuff, please.
- Zest of 1 lemon — about 1 packed teaspoon. Microplane it. Don’t include any white pith.
- 2 tsp powdered gelatin — Knox is the supermarket standard. Vital Proteins beef gelatin also works beautifully and adds a tiny bit of extra protein.
- 3 tbsp cold water (for blooming the gelatin)
- 2 tbsp hot water (for dissolving the bloomed gelatin)
- Optional: 1 scoop (~30g) vanilla whey protein — for an extra boost. Adds about 3g protein per slice. Use a brand you actually like the taste of (I use Legion or Transparent Labs). Don’t add casein, it’ll thicken too aggressively.
Don’t have gelatin?
- Agar agar works as a vegetarian swap. Use 1 tsp agar powder, dissolved by simmering in 3 tbsp water for 1-2 minutes. The set will be slightly firmer.
- Skip it entirely and chill in cups. Spoon the filling into 8 small jars or ramekins, top with crust crumbled on top, chill 4 hours. No clean slice needed, still delicious.
Step-by-Step Instructions
Make the crust (5 minutes)
- Pulse the oats. Toss the rolled oats into a food processor and pulse 8-10 times until they look coarse and sandy with a few bigger flakes still visible. You don’t want oat flour — you want texture.
- Add nut butter, maple, and salt. Add the almond or peanut butter, maple syrup, and pinch of salt. Pulse another 8-10 times until the mixture clumps when you squeeze it between your fingers. If it’s too dry, add a teaspoon of water; if it’s too wet, add a tablespoon more oats.
- Press into the pan. Line an 8-inch springform pan with parchment on the bottom (just press a square in, springform-clamp closed, trim excess). Dump the crust mixture in and press firmly across the bottom and about 1/2 inch up the sides. The bottom of a measuring cup is the best tool for this. Press hard — a loose crust will crumble.
- Chill while you make the filling. Stick the pan in the fridge while you make the filling. 10 minutes minimum.
Make the filling (10 minutes, plus blooming)
- Bloom the gelatin. Sprinkle 2 tsp powdered gelatin over 3 tbsp cold water in a small bowl. Don’t stir. Let it sit for 5 minutes — it’ll look like wrinkly rubber. That’s correct. Once it’s bloomed, pour 2 tbsp hot (just-off-the-boil) water over it and stir gently with a fork until the gelatin completely dissolves and the liquid is clear. Set aside but don’t let it cool to the point of resetting.
- Blend the cottage cheese, hard. This is THE critical step. Add the full 2 cups of cottage cheese to a high-speed blender or food processor. Blend on high for a full 60-90 seconds, scraping the sides at least once. You’re done when the cottage cheese is completely smooth — no visible curds at all, glossy, pourable like thick yogurt. If you’re seeing any texture, blend longer. There are no shortcuts here.
- Add the rest of the filling. Add the Greek yogurt, maple syrup, vanilla, lemon zest, and (if using) the scoop of whey protein to the blender. Blend another 20-30 seconds until completely uniform.
- Stream in the gelatin. With the blender running on low, slowly pour in the dissolved gelatin mixture. Blend another 15 seconds to fully incorporate. The filling should now pour like thick honey — flowing, but slow. If it’s soupy, the gelatin didn’t fully dissolve; if it’s already thickening fast, it set too soon (still salvageable, just work fast).
Assemble and chill (4+ hours)
- Pour into the crust. Pull the chilled crust from the fridge. Pour the filling directly onto the crust, scraping the blender clean. Smooth the top with a small offset spatula or the back of a spoon. Tap the pan gently on the counter twice to release any air bubbles.
- Cover and chill. Cover the pan loosely with plastic wrap (don’t let it touch the surface) or a large overturned bowl. Refrigerate for at least 4 hours, ideally 8-12 hours (overnight). The longer chill gives you a denser, cleaner slice.
- Unmold and slice. When ready to serve, run a thin knife around the edge of the pan, then release the springform clamp. Lift the ring straight up. For clean slices, dip a sharp chef’s knife in hot water, wipe dry, and cut. Re-warm the knife between every slice. Serve cold.
Tips, Swaps, and Troubleshooting
1. If your filling tastes grainy, you didn’t blend long enough. This is the single most common mistake. Cottage cheese curds need a full 60-90 seconds on high speed to fully break down. If you tasted the filling before pouring and noticed any chalkiness or curd texture, dump it back in the blender and go another minute. The texture should feel like silk on your tongue, full stop.
2. Gelatin temperature matters more than you think. If you pour the dissolved gelatin into a cold filling too aggressively, it’ll seize into little gelatin strings and you’ll get streaks of rubber in your cheesecake. Keep the gelatin warm-but-not-hot when you stream it in, and have the blender running. If your filling is straight-from-the-fridge cold, let the dairy come up to room temp for 15 minutes first.
3. Dairy-free swap (it won’t be the same, but it’ll be good). Sub the cottage cheese with 1.5 cups soaked raw cashews + 1/2 cup unsweetened plant yogurt, and the Greek yogurt with another 1 cup of plant-based Greek-style yogurt (Kite Hill is best). Use agar agar instead of gelatin. Texture will be richer and slightly less tangy. Protein will drop to about 14g per slice.
4. Scaling to a 9-inch pan. Multiply everything by 1.3. Your slices will still be 8 servings but slightly thinner — which is honestly nice for serving with a generous topping.
5. Mini cheesecake jar version. Skip the springform entirely. Press 2 tablespoons of crust into the bottom of 8 small mason jars or ramekins, then divide the filling on top. Chill 3 hours. Top however you want. Great for meal prep, packs in a lunchbox, no slicing required.
6. Slicing cleanly — the warm knife trick. Fill a tall glass with hot tap water. Dip your sharpest knife in, wipe completely dry on a clean towel, slice. Wipe and re-warm between every single slice. This is the difference between Pinterest-worthy slices and a cheesecake that looks like it was attacked by a raccoon.
7. Choosing toppings. A juicy fruit topping like berry compote contrasts beautifully with the dense filling. If you want pure visual drama, fan sliced strawberries across the top. If you want fancy, a swirl of lemon curd before chilling looks insane. See the topping ideas section below.
8. The filling isn’t setting. Two likely culprits: your gelatin didn’t fully dissolve (you’ll see tiny granules) or you didn’t chill long enough. If the filling is still soft after 4 hours, give it another 4 in the fridge — it’ll often firm up the rest of the way. If it never sets, you have a great cheesecake-flavored mousse for spooning over yogurt and granola. Not a loss.
9. Make-ahead friendly. This is genuinely better on day 2 than day 1. The flavors meld, the crust hydrates slightly, and the filling tightens up. Make it the day before any party.
Topping Ideas
- Berry compote. My favorite. Add 1.5 cups of strawberries (halved) or mixed berries to a small saucepan with 1 tbsp maple syrup and a squeeze of lemon. Simmer over medium-low for 6-8 minutes, mashing gently with a fork, until the berries break down and the syrup thickens. Cool completely before spooning over the chilled cheesecake.
- Fresh berries piled high. The laziest, most photogenic option. Toss raspberries, blackberries, sliced strawberries, and blueberries with a teaspoon of maple syrup and a tiny bit of lemon zest. Pile in the center.
- Sliced strawberries fanned. Cut strawberries in thin even slices and fan them out from the center in concentric circles. Brush with a tiny bit of warmed apricot jam for a glossy finish. This is the cover-of-a-magazine move.
- Dark chocolate drizzle. Melt 30g of 70% dark chocolate with 1 tsp coconut oil. Drizzle over the chilled cheesecake in messy zig-zags. Let set 5 minutes before slicing.
- Lemon curd swirl. Spoon 3-4 tablespoons of good lemon curd onto the filling before it chills, swirl gently with a toothpick. Chill as normal. Pairs beautifully with the lemon zest already in the filling.
Storage and Make-Ahead
This cheesecake keeps in the fridge, covered, for up to 5 days. The texture genuinely gets better on days 2 and 3. Keep it in the springform pan or transfer to an airtight container. If you’ve added a wet topping like compote, store the topping separately and spoon it on right before serving so the surface doesn’t weep.
For longer storage, freeze it sliced. Slice the chilled cheesecake into wedges, place each slice on a parchment-lined sheet pan, freeze solid (about 2 hours), then wrap each slice individually in plastic wrap and stash in a zip-top freezer bag. Frozen slices keep for up to 1 month. Thaw a slice in the fridge for 3-4 hours, or on the counter for 30-40 minutes. Don’t microwave — gelatin doesn’t like that.
Make-ahead tip: this is the perfect recipe to make the day before a dinner party. Less stress on the day, better texture on the plate.
Nutritional Breakdown (per slice, 1/8 of cake)
- Calories: 285
- Protein: 27g (this is the headline number — 27 grams of protein per slice of cheesecake, which is genuinely wild)
- Carbs: 24g
- Sugar: 11g (mostly from the maple syrup and natural dairy sugars)
- Fat: 11g
- Fiber: 2g
If you add the optional scoop of whey protein, the per-slice protein bumps up to roughly 30g. With the lower end of cottage cheese (some brands run lower in protein), the floor is around 25g per slice. So you’re solidly in the 25-30g range no matter which products you grab.
Standard estimate disclaimer: nutritional values are calculated using average ingredient data and will vary based on the specific brands and exact measurements you use. Use these numbers as a directional estimate, not a precision tool.
No-Bake Cottage Cheese Cheesecake (High-Protein)
Creamy, dense, no-bake cottage cheese cheesecake with 27g protein per slice. Even cottage cheese skeptics ask for the recipe. Sets clean. No baking, ever.
Ingredients
- Crust: 1 1/2 cups (150g) rolled oats
- Crust: 1/3 cup (90g) almond butter or peanut butter
- Crust: 3 tbsp (60g) maple syrup
- Crust: Pinch of salt
- Filling: 2 cups (16 oz / 450g) full-fat cottage cheese (4% milkfat)
- Filling: 1 cup (240g) full-fat Greek yogurt (5%+)
- Filling: 1/4 cup (80g) maple syrup or honey
- Filling: 1 tsp pure vanilla extract
- Filling: Zest of 1 lemon
- Filling: 2 tsp powdered gelatin
- Filling: 3 tbsp cold water (for blooming)
- Filling: 2 tbsp hot water (for dissolving)
- Optional: 1 scoop (~30g) vanilla whey protein
Instructions
- Pulse rolled oats in a food processor 8-10 times until coarse. Add nut butter, maple syrup, and salt; pulse until the mixture clumps when squeezed.
- Press the crust mixture firmly into the bottom and 1/2 inch up the sides of a parchment-lined 8-inch springform pan. Refrigerate.
- Bloom 2 tsp gelatin in 3 tbsp cold water for 5 minutes, then dissolve with 2 tbsp hot water until clear. Set aside.
- Blend cottage cheese alone in a high-speed blender for 60-90 seconds until completely smooth and silky.
- Add Greek yogurt, maple syrup, vanilla, lemon zest, and optional whey protein. Blend until uniform.
- With the blender on low, stream in the dissolved gelatin. Blend 15 seconds to fully incorporate.
- Pour the filling onto the chilled crust. Smooth the top and tap the pan to release air bubbles.
- Cover loosely and refrigerate for at least 4 hours, ideally overnight.
- To serve, release the springform ring and slice with a knife dipped in hot water and wiped dry between slices.
Notes
- Blend the cottage cheese alone first to fully break down the curds – this is the most important step.
- Use full-fat dairy only; low-fat versions get watery and chalky.
- Cheesecake is better on day 2 than day 1.
- Slices can be frozen up to 1 month, individually wrapped.